<<-- Introduction | <-- World map 1 | World map 2 -->
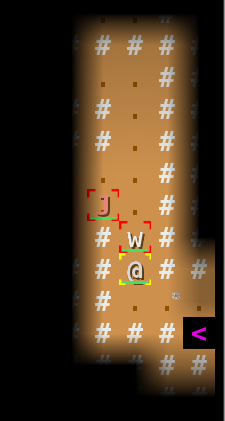
Norgos' Lair has lots of narrow corridors which funnel monsters to us one at a time. The bad news is that it's got lots of bears and snakes. The bears aren't so bad for a Fighter, but the snakes can be deadly if we're not careful.
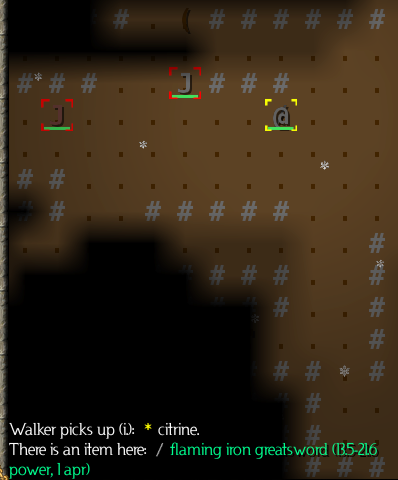
Here we see a white worm mass and a copperhead snake. We can mouse over the snake (or hit Shield Pummel and then move the target), to see that it's a level 3 copperhead -- not too bad. We don't really need to worry until we find one that's level 5 or higher.
We can just beat the white worm mass by attacking it; we'll use Shield Pummel for the snake.
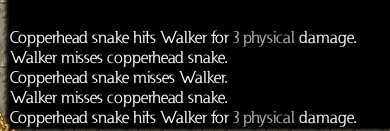
Damned snakes, always slithering.... We definitely want more Accuracy, but we can't get it just yet. We're either going to have to level up, or find some better equipment. Meanwhile, we do what Fighters do: endure.
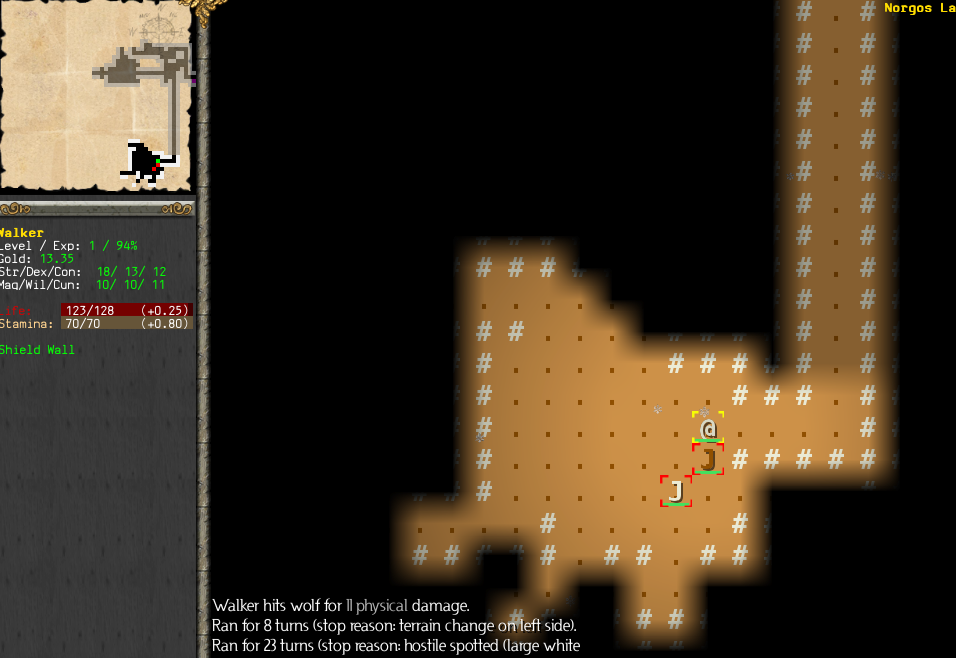
After a bit of exploration, we find two snakes in a clearing. We don't want to fight both of them at the same time, so we retreat into the corridor to the east. The brown snake is going to get a free hit on us while we do that, but once we're in the corridor, they won't be able to double-team us. So it's worth it.
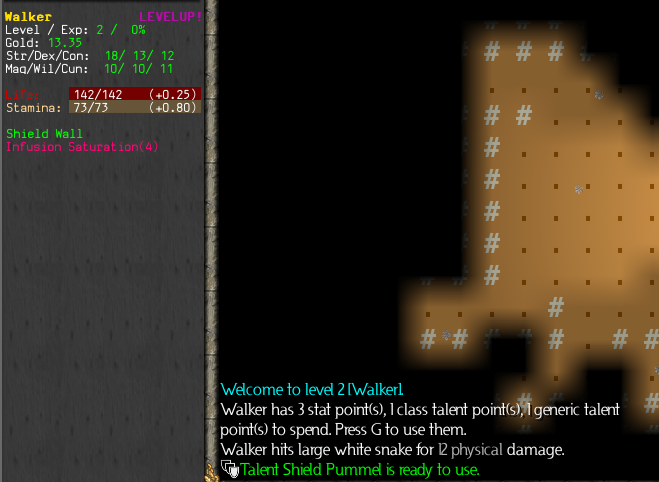
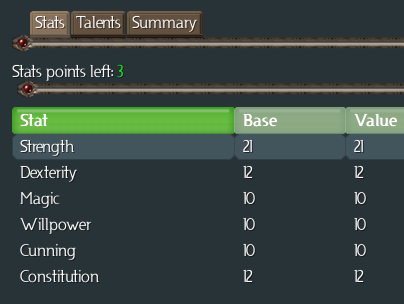
Killing both snakes brings us to level 2. Yay! Now we press Shift-G and we get to distribute points again.
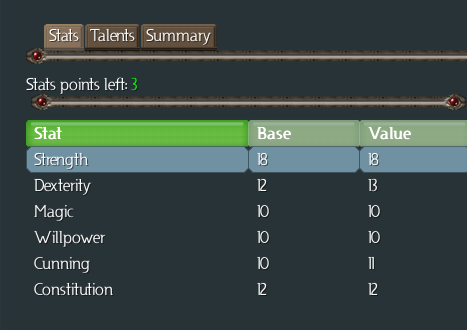
We've still got that cloak on, which is raising our Dex and Cunning by 1 point, so the values of those stats are a point above the base. If we had 1 more point in Cunning, we'd be able to learn the Trap Detection talent. But even if we do find a trap, there's not a whole lot we can do about it -- especially in narrow corridors. We'd just have to step on it anyway, to get to the other side. There's not much point in learning Trap Detection right now, so we'll postpone Cunning until later, and hope we pick up some more equipment with Cunning bonuses.
We need 4 more points of Strength to wear the armour we found, but we've only got 3 points. Too bad -- no plate armour for us this time. Still, we definitely want some Strength. The only question, really, is whether we want to put all 3 points into Strength, or to spread them a little.
At this point, the equipment requirements and weapon damage benefits really all point to Strength. Let's just put all 3 points into Strength.
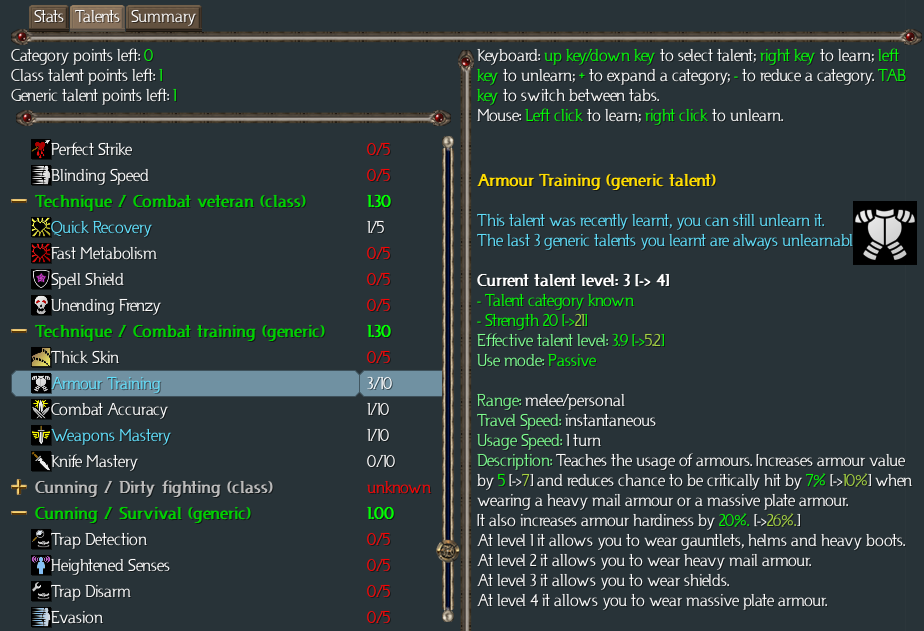
With the boosted Strength, we have more choices available in the Combat training tree, for spending our generic talent point. In fact, there are three talents we definitely want to boost, and the only question is which one we want to boost first. Armour Training would let us wear that plate armour, if we could get one more point of Strength. We could potentially find equipment that would give us that, but it's a long shot. Most likely, we simply won't have the Strength for the plate armour until next level.
On the other hand, we're in a zone with a lot of snakes, and we've already had some trouble hitting them. So let's put the generic point into Combat Accuracy. That will help us hit things.
The class talent point also gives us an interesting choice. We could put another point into Shield Wall, and get more Defense and Armour and stun resistance (did I mention that bears can stun?), and there's definitely nothing wrong with that decision. We're going to be maxing Shield Wall by level 9 or 10 anyway.
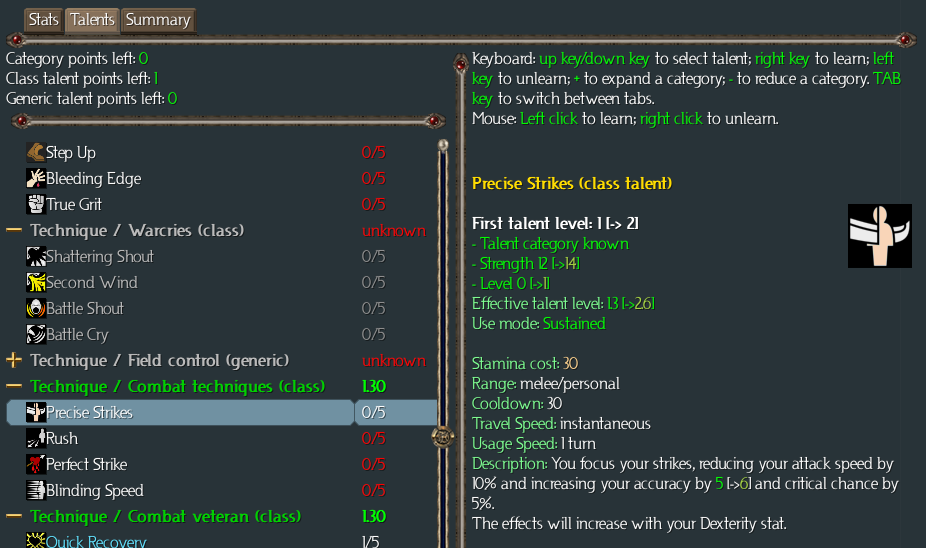
On the other hand, Precise Strikes gives us more accuracy, and a better chance of critical hits, at the cost of attack speed. And it's a prerequisite for Rush, which we'll want to take later. Let's take Precise Strikes.
Precise Strikes is a sustained talent, and we just learned it (and we weren't just born), so it goes on cooldown. In 30 turns, we'll be able to activate it.
Meanwhile, let's continue exploring.
Another cloak! Now we have another choice to make.

If we open the inventory screen, hover on the new cloak, and hold the Ctrl key, we can see a comparison between the new cloak and the cloak we're wearing.
The new cloak has 6 points of Armor, the same Defense, no Cunning or Dex bonus, no cold resistance bonus, and +30 maximum Life.
So we have to decide which of these is better for us, at this time. Consider the monsters we're facing -- snakes and bears, primarily. These don't have cold-based attacks, so the cold resistance isn't really helping us. On the other hand, +6 Armor and +30 Life would definitely help! Would they help more than +1 Cunning and +1 Dex? Yes, they probably would. So let's switch to the new cloak.
Precise Strikes is still on cooldown, so we continue.
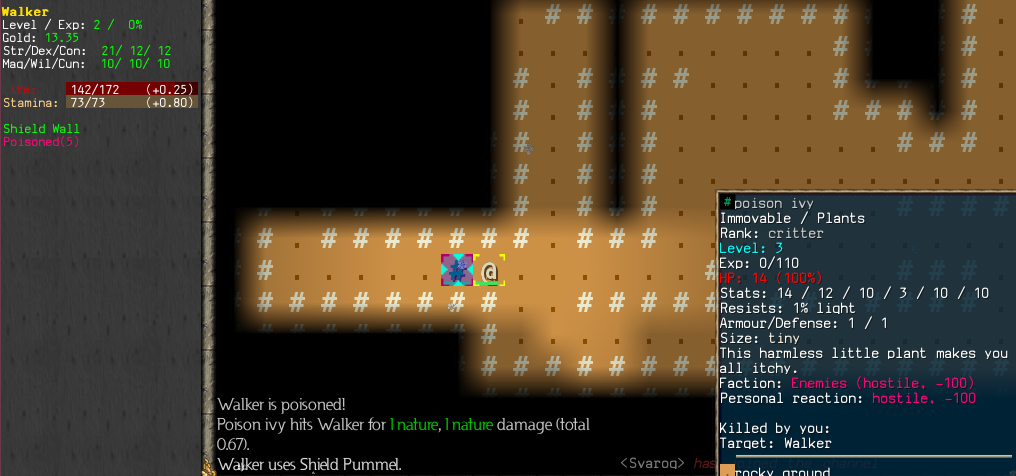
A poison ivy plant! Notice that we're poisoned -- a red effect is bad, while a green effect is good. The (5) after the effect name indicates the number of turns of the effect remaining. We're already poised to Shield Pummel this uppity salad, so let's go ahead with that plan.
The Pummel kills it, but we're still poisoned. It's a very weak poison -- just 1 point of damage per turn -- but we have a Wild Infusion which will cure it. So we'll use that, and remove the poison effect.
The Wild Infusion also gives us a green effect -- Pain Suppression. This increases our damage resistance for the next few turns. Too bad there are no monsters nearby. We continue exploring.
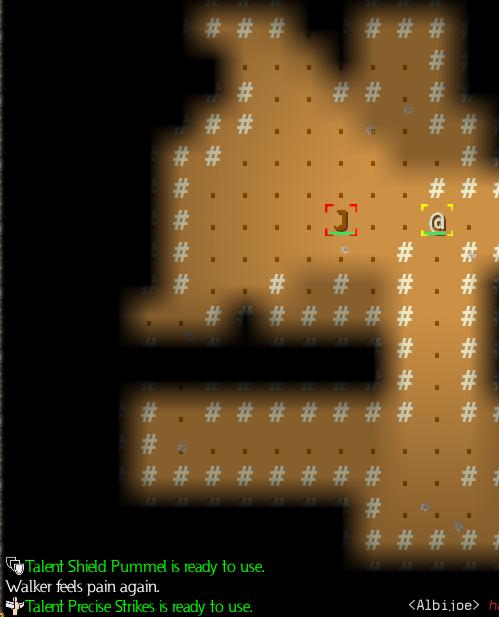
A snake... and our Precise Strikes is ready. Let's activate that (it's another sustained talent, like Shield Wall), and then check our character sheet again.
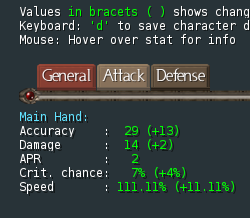
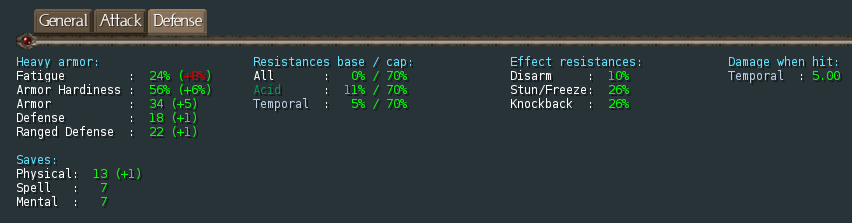
Our Accuracy is now almost double what we started with! Excellent. That'll show those snakes a thing or two about Fighters. We've got a couple more points of Damage as well, due to the Strength increase. Our critical hit chance is nearly doubled as well. But our attack speed has "increased"... actually, that's bad. (It's probably a bug that it shows a green modifier instead of a red one.) The attack speed is actually an energy cost to make the attack, and a higher number is worse here. Precise Strikes slows down our attacks a little bit. But it's worth it, at this point.
The other thing to note is that our stamina resource pool is now down to 43 points, because we have two sustained talents reducing it. That's OK. We only use stamina for Shield Pummel, and we can still get 4 of those in before we need to rest. That should be plenty for the fighting we're likely to encounter.

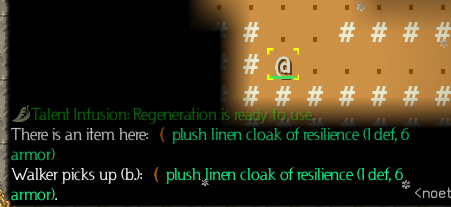
Ah, boots! We've been running around barefoot this whole time (don't ask), so this is a no-brainer.
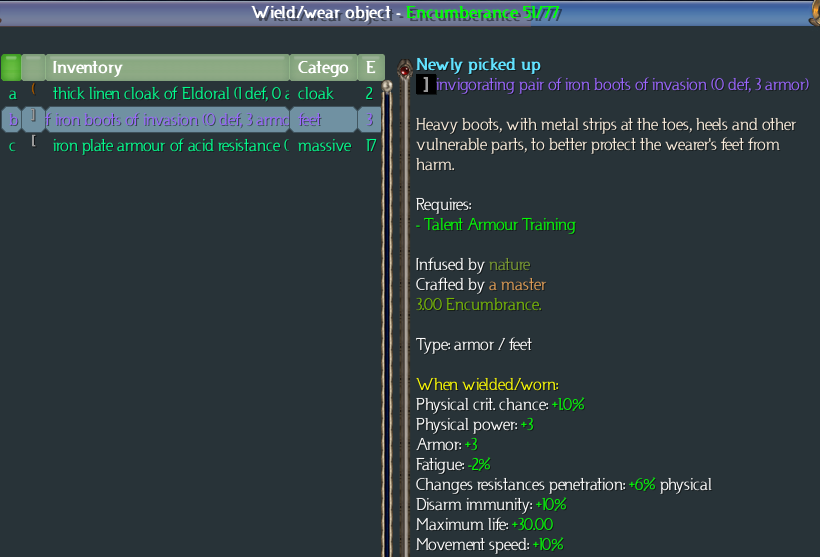
Dig the fancy shoes! Even if we had another pair of shoes to choose from, these would likely beat them. The green color on an item indicates that the item has one or two ego powers. Most of the stuff we find will be green. White items, like our starting gear, have no enchantments at all. Blue (we haven't seen any blue yet) means an item with a single greater ego power. Purple, like these boots, means it has two greater ego powers.
We're definitely wearing these.
Our encumbrance level is also starting to become something we need to keep an eye on. We can't carry everything we find, although for right now we simply haven't hit that limit yet, due to lack of stuff found.
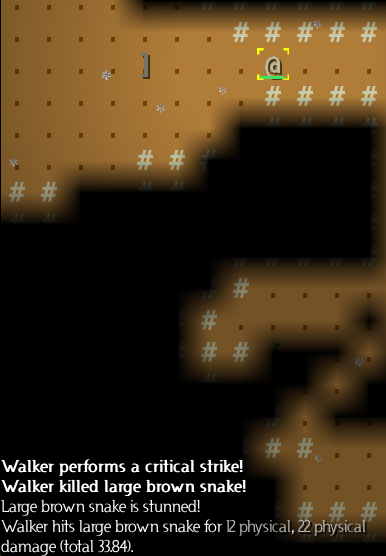
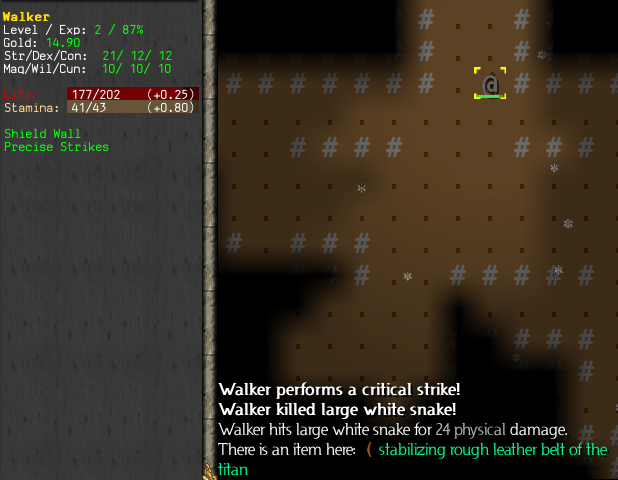
Our critical strike Shield Pummel did 33 points of damage. Hey, we're getting there. And what's that armour over there....
It's stalker's pair of iron boots of uncanny dodging (0 def, 3 armor). That's nowhere near as good as our purple boots, but we'll take them to sell.
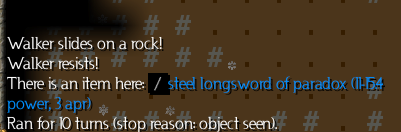
Here's a blue item. It's clearly better than our iron longsword, and we can equip it right now, so hooray!
That turned out to be the last thing we found on level 1, so now we proceed down to level 2. (The boss of this zone is on level 3.)
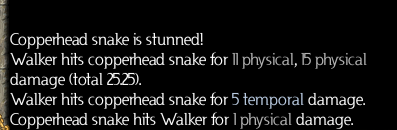
Our new sword does around 25 physical damage in a Shield Pummel (no critical), plus another 5 points of temporal damage in retaliation when the snake attacks us. It's a nice upgrade.
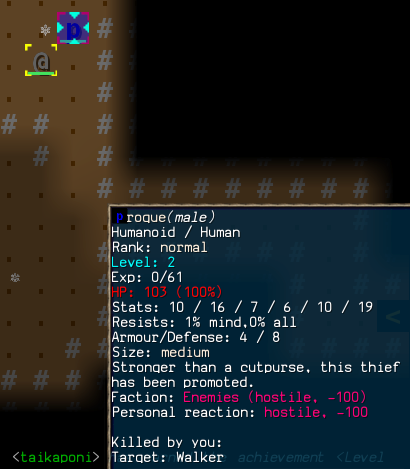
Rogues can appear just about anywhere (although some places are more likely than others). They are like snakes with more Hit Points -- high Dexterity and Defense, high Accuracy, and some of them have poisoned weapons.

... but unlike snakes, they drop gold.
A greatsword is a two-handed weapon. As a Fighter, we're never going to use a two-handed weapon. Ever. We'll grab it to sell, as long as it doesn't encumber us to the point where we can't walk.

Did I mention there are snakes here? Yeah... and we're out in the open. We could either stand and fight, or we could try to duck into that corridor to the south. Since the first snake is almost dead, let's just tough it out here.
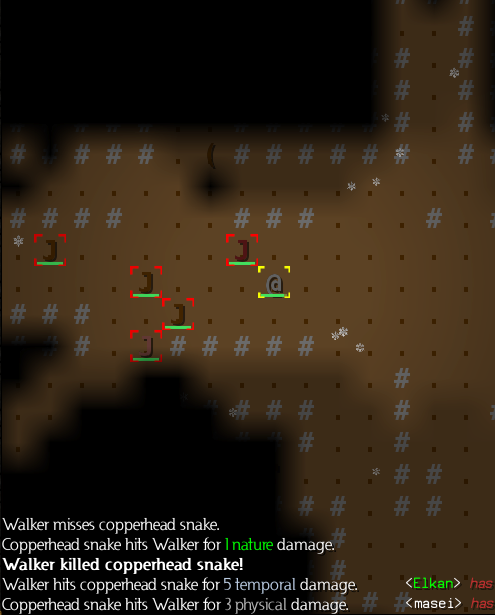
OK, that's getting a little ridiculous. And the corridor to the south doesn't look very promising, since the western side of it appears to be open as well. Maybe that corridor to the northeast would work. It's a bit risky, because the other end of it is unexplored, but it's less risky than the southern corridor with snakes on both ends.
Oh, and we're also poisoned -- not a lot, but it's worth using the Wild Infusion before we start walking. The Wild Infusion is instantaneous, so it won't cost us any time.

This will have to do. We'll stand here and fight the snakes until they stop coming.
We'll use the Regeneration Infusion whenever it seems appropriate, and Shield Pummel on the tougher ones.
The snakes are dead, and we aren't... and we've found a new belt!
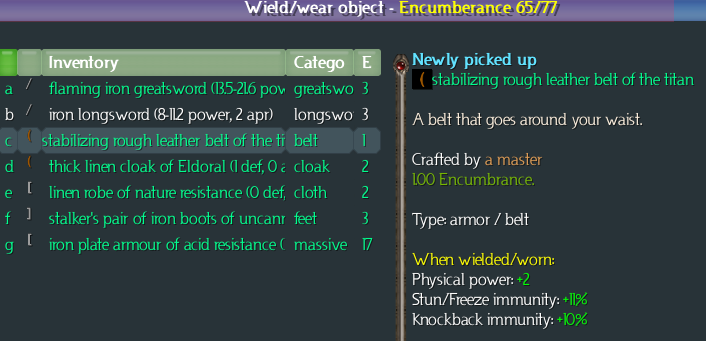
Stun resistance is always good. The +2 physical power adds to our weapon damage -- that's good too!
Pretty soon, we're ready to level up again.
We still have that cloak with the Dex and Cunning bonuses, and we could swap that in, if it would help us. But for now, we don't really want those bonuses. We're only getting 1 more generic point, and we know we want it to go into Armour Training (not Trap Detection), so the Cunning isn't immediately useful.
Once again, let's just put all 3 points into Strength.
The generic point goes into Armour Training, which will let us wear that plate armour we've been lugging around for the last 3 levels. The class talent point, on the other hand, has no urgent use. When we hit level 4, however, we're going to get access to a whole lot of talents -- Riposte, Repulsion, Rush, and Fast Metabolism. We'd ideally love to take all of those (except maybe Repulsion), but we'll only get one class talent point. So let's save the point we have now. That way we'll be able to take two of those talents next level.
That's starting to look pretty.
Our next find is an iron mace of paradox (7-9.8 power, 2 apr). That's not as good as our steel longsword of paradox, so into the backpack it goes.

Ah, about time... another Regeneration Infusion. This one has even more power than the one we started with. The psychic's prefix means its power also scales with our Willpower stat (not one that we'll be boosting much, but we could find equipment with bonuses). Even better is that this is only our third infusion, so we don't have to give up anything. We started with 3 slots but only 2 infusions. We'll use this and have two Regeneration infusions. That's quite helpful in tougher battles.
We'll grab this, but it almost puts us over our encumbrance limit -- 82 out of 83. We're going to have to drop something before we're done with this zone. But we'll put that decision off until later, so we can drop the heaviest, least valuable stuff.
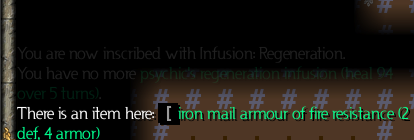
... or we could do it now. Looking through our pack, we can see that the heaviest, and least valuable thing we've got is the iron mail armour we started with. So we'll drop that.
Three poison vine traps later, and we're heading down to level 3.
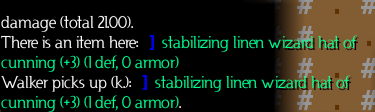
Our first hat! And it's got a Cunning bonus that's strong enough to let us learn Trap Detection if we want to. Plus stun resistance. Not bad.
And here is Norgos himself. He just wants to give us a hug....
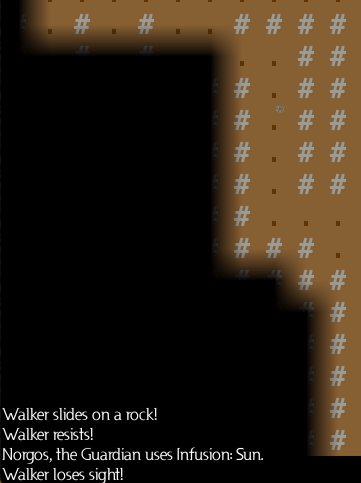
Did you know monsters can use runes and infusions too?
Now you know.
But he's really not a threat to us....
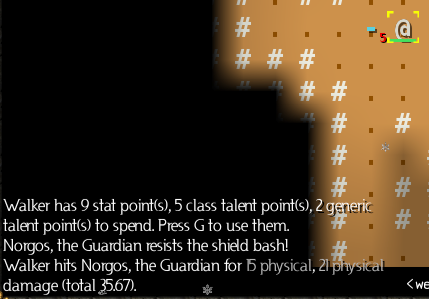
Yes, that's three level-ups. Bosses in ToME 4 give a lot more experience than anything else, and when you're only level 3 in the first place, those XP can give you a huge boost.
But first, let's see what stuff he gave us!
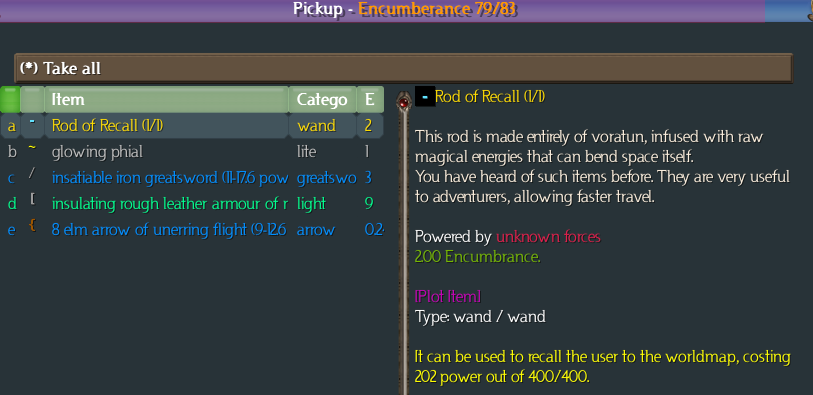
That's actually not a great haul. The Rod of Recall is guaranteed from the first boss, so there was no randomness there. The glowing phial's good, and we'll be using it (not that we've needed a light source yet, since we've only been in lit-up zones so far). The greatsword is two-handed, so it's immediately useless. The light armour is also useless to us, since it negates our Armour Hardiness bonuses. The arrows, we'll just sell. In fact, all of the stuff in this pile is sell-fodder except the Rod and the phial.
We'll pick it all up (going over encumbrance), then do our leveling up, which will raise our Strength. Then after that we'll decide what to drop.
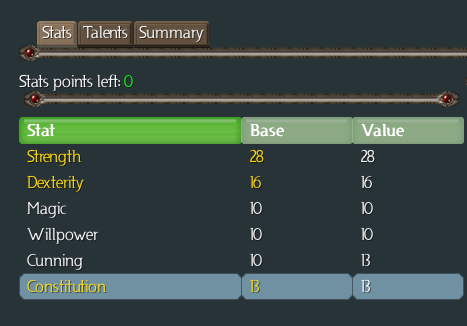
For stats, we'll raise Strength to 28 (that's 6 of our 9 points). We'll raise Dexterity by 2 points, and Constitution by 1 point, just to balance things a bit. 28 Strength would allow us to use a dwarven-steel weapon should we be lucky enough to find one -- not very likely right now, but not impossible either. Plus, Strength is just plain good for us overall.
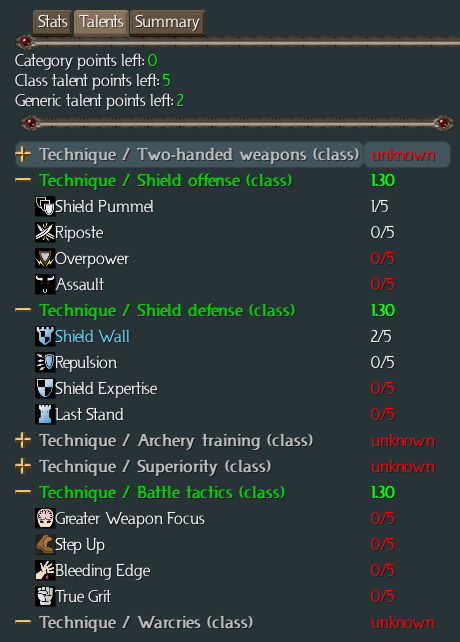
Now we've got a lot of class talent points to play with. That's good, because we want a lot of new talents. We're going to put 1 point in Riposte, and 1 point in Repulsion. (When we leave this screen, we'll move Repulsion to a hotkey farther to the right, since we won't be using it much.) Then a point in Rush, and a point in Fast Metabolism. That leaves us with 1 point, which we could either save, or use to improve a talent we already have. We're going to use it to raise Shield Wall to level 3.
We also have two generic points. There are fewer choices here. Since we've got the Cunning bonus from the hat, let's go ahead and take Trap Detection. It's not greatly useful, but it won't hurt. For the other point, we're choosing among Armour Training, Combat Accuracy, and Weapons Mastery. With the investment we've already got in Accuracy (including Precise Strikes), we don't really need the Accuracy. So that leaves "more armour" or "more damage". They're both solid choices. Let's take Weapons Mastery.
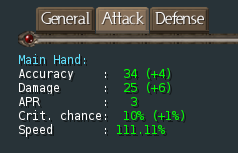

Oooh, pretty numbers.
Next I remap Repulsion and Rush to their hotkeys. Then I check my inventory to see what to drop.
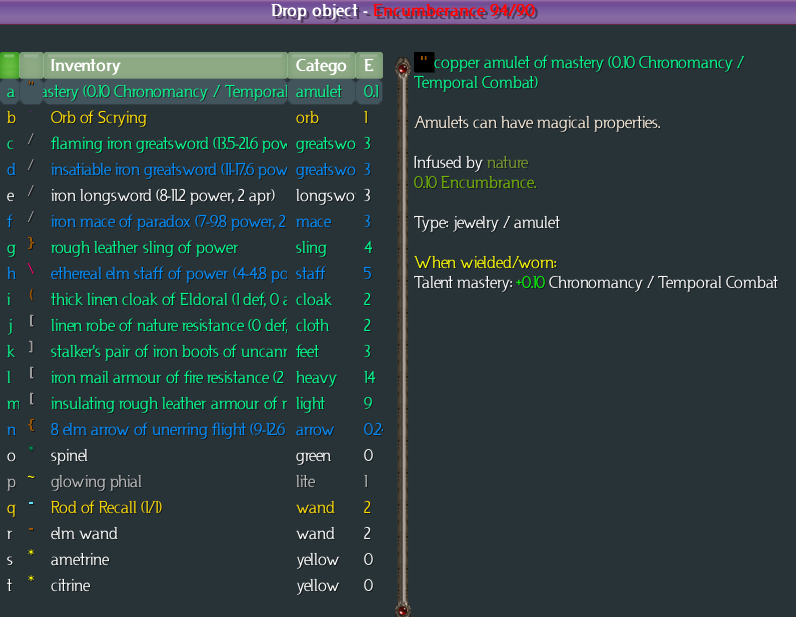
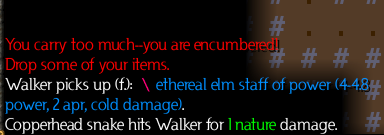
Pressing d brings up the drop screen. I need to drop 4 pounds (or whatever units) of stuff. That white longsword is 3 pounds, so I just need 1 more... ah, the linen robe of nature resistance. That'll do.
Then we finish exploring the level, because there might still be more stuff to kill and to find.
An iron helm of dexterity (+3) (0 def, 3 armor) replaces the hat of cunning, although I'll hold on to the hat because it has Cunning and stun resistance. It also means I need to drop more stuff... the boots of uncanny dodging can go.
A phase iron waraxe (7.5-10.5 power, 8 apr) can stay on the ground. So can the shocking iron greatsword (12-19.2 power, 1 apr).
And that completes the level; none of the other fights yielded any equipment (typical for this zone; the snakes and bears and snakes and wolves and snakes don't generally have any drops). We'll use the Rod of Recall to get out.
At some point, we can also use the Orb of Scrying to learn that the phial is the Summertide Phial (any veteran ToME 4 player would have recognized it already), and swap it in for the brass lantern.
Then we just have to run around for 40 turns, until the Recall kicks in.